Backyard weather station with AI forecast notes
An ESP32 reads the SparkFun Weather Meter Kit (wind speed, wind direction and rain) plus a BME280 for temperature, humidity and pressure in a printed radiation shield. Home Assistant logs it all, and a local AI model writes a short morning note comparing your readings with the official forecast.
Safety first
- Do not mount the mast on a roof or near power lines, and never work on it during a storm. A tall metal mast should not be the highest point on your property.
- Keep the USB adapter indoors and route the cable through a drip loop.
- Use a ladder only with a helper.
Rules and laws
- Check HOA or local rules before putting up a mast. Your station's readings and AI notes are a hobby, not an official forecast or warning; use the National Weather Service for warnings.
Parts
| Part | Qty | Approx. each | Subtotal |
|---|---|---|---|
| SparkFun Weather Meter KitPrice seen $79.95 on SparkFun (Nov 12, 2026). Anemometer, wind vane and rain gauge with RJ11 plugs.SparkFun | 1 | $79.95 | $79.95 |
| Espressif ESP32-DevKitC-32E (DevKitC V4) development boardOfficial Espressif 38-pin DevKitC V4 with ESP32-WROOM-32E (4 MB). Micro-USB port, not USB-C. Buy only the official 38-pin Micro-USB board, not a USB-C or 30-pin clone. Primary listing: Mouser 356-ESP32-DEVKITC32E, $10.20, 1,701 in stock on Nov 12, 2026, per Findchips (https://www.findchips.com/search/ESP32-DEVKITC-32E). The Mouser US page itself returned 403 to a direct fetch, so click-confirm the US storefront before you order. Mouser Netherlands listed 1,622 in stock at €8.60 the same day. Do not use DigiKey as the default today (search snippets showed 0 in stock / long lead time). Official Amazon listing https://www.amazon.com/dp/B09MQJWQN2 was still unavailable; use it if it returns. Amazon search for the official board: https://www.amazon.com/s?k=ESP32-DevKitC-32E. Adafruit #3269 remains $15.00 and was out of stock (https://www.adafruit.com/product/3269). Typical $10-16.Mouser | 1 | $10.20 | $10.20 |
| BME280 temperature, humidity and pressure sensorMake sure it is a BME280, not a BMP280 (no humidity). Adafruit's version is $14.95. Typical $7-15, no verified link.Amazon (search) | 1 | $9 | $9 |
| RJ11 6P6C breakout board (pack)Typical $6-11, no verified link.Amazon (search) | 1 | $8 | $8 |
| Resistor assortment kit (1/4 W)10 k for the wind vane divider and pull-ups. Typical $7-13, no verified link.Amazon (search) | 1 | $10 | $10 |
| IP65 junction box, 150 x 110 x 70 mmTypical $9-16, no verified link.Amazon (search) | 1 | $12 | $12 |
| 5 V 2 A USB wall adapterTypical $5-10, no verified link.Amazon (search) | 1 | $7 | $7 |
| USB-A extension cable, 10 mTypical $9-16, no verified link.Amazon (search) | 1 | $12 | $12 |
| M6 threaded rod and nuts kitNeeded for the MakerMeik Stevenson-screen radiation shield (CC BY-NC, download from the designer). Typical $8-16, no verified link.Amazon (search) | 1 | $12 | $12 |
| 1-inch mounting pole, 5 ftSkip if you already own one. Skip if you mount on an existing post. Typical $14-30, no verified link.Amazon (search) | 1 | $20 | $20 |
| Estimated total (parts only) | $180.15 | ||
Typical US prices, checked 2026-11-12. Prices change and multi-packs are often cheaper per piece.
As an Amazon Associate I earn from qualifying purchases. Prices change; check the store.
Filament
ASA (1.75 mm): about 250 g (98 m), roughly 16 h of printing.
ASA (UV resistant) in white, 0.2 mm layers, 20% infill, 3 walls; print in an enclosure. White PETG is a cheaper option but yellows in sun.
AI agents you'll use
- Code helper (ChatGPT, Claude, Gemini or Grok): Writes the ESPHome YAML: pulse counters for wind and rain, ADC with a lookup table for wind direction, the BME280, and sensible update intervals.
- Forecast note writer: In Home Assistant, compares your overnight readings with the National Weather Service forecast for your area and writes a three-sentence note. It labels it as a hobby note, not a forecast.
Tools
- Soldering iron
- Drill
- Multimeter
- Zip ties and hose clamps
- USB data cable
What you'll learn
- Counting wind and rain pulses
- Reading a resistor-network wind vane
- Siting sensors so readings are honest
- Summarizing data with a local AI model
Know exactly how windy and wet it was in your own yard, not at the airport 20 miles away. Then let a local AI write a quick morning note that compares your data with the official forecast.
What you'll build
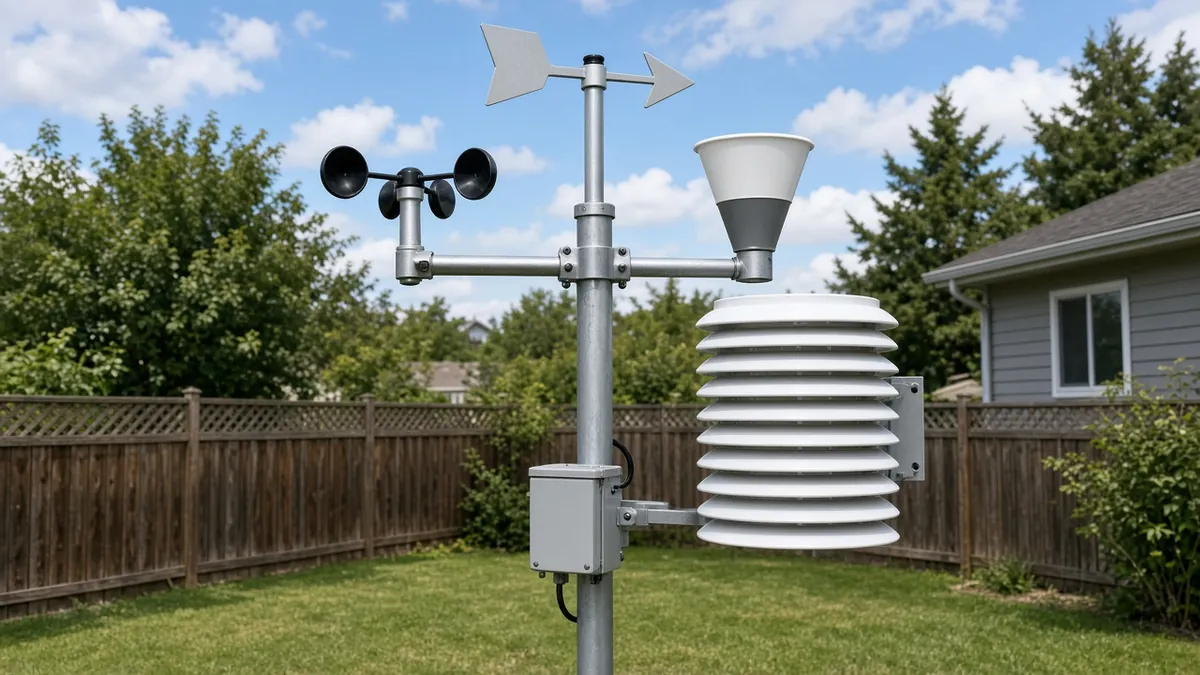
A pole with the SparkFun anemometer, wind vane and rain gauge, a printed stacked-plate radiation shield with the BME280 inside, and an IP65 box with the ESP32. ESPHome counts anemometer and rain-gauge pulses, reads the vane's resistor network through a voltage divider, and sends everything to Home Assistant. Each morning an automation asks a local AI model to write a short note from your data and the NWS forecast.
The cost range is $140-200. The low end assumes you already own these items marked "skip if you already own one": 1-inch mounting pole, 5 ft. The high end includes them.
Print the parts
Download MakerMeik's stacked-plate Stevenson-screen radiation shield from Printables (model 109971) and print it in white ASA. That listing is CC BY-NC — credit the designer, and do not host or redistribute the files. The design uses M6 threaded rod and nuts (added to the parts list). Also print or buy a mount for the IP65 junction box.
Wiring
| From | To | Notes |
|---|---|---|
| Anemometer (RJ11 middle pair) | ESP32 GPIO27 and GND | INPUT_PULLUP; 1 pulse per second = 2.4 km/h per SparkFun. |
| Rain gauge (RJ11 middle pair) | ESP32 GPIO26 and GND | INPUT_PULLUP; each tip is about 0.2794 mm per SparkFun. |
| Wind vane (RJ11 outer pair) | 3V3 via a 10 k resistor to ESP32 GPIO35, vane other side to GND | Divider; map voltages to 16 directions with SparkFun's table. |
| BME280 SDA / SCL | ESP32 GPIO21 / GPIO22 | Inside the radiation shield, on a 1-2 m cable. |
| ESP32 USB | 10 m extension to the indoor adapter | Drip loop at the box. |
Step-by-step
- Wire everything on the bench and check each sensor in ESPHome logs.
- Calibrate the wind vane lookup table with a compass.
- Print the shield and mount the BME280 inside it, away from the box.
- Put up the pole: anemometer as high and clear as practical, rain gauge level and away from roof run-off.
- Add the dashboards and the morning AI note automation in Home Assistant.
- Compare your readings with a nearby official station for a week.
Code
ESPHome YAML with pulse_counter, adc and bme280 components; no hand-written firmware.
Prompt for the code helper:
Write an ESPHome YAML for an ESP32 weather station: SparkFun anemometer on GPIO27 (pulse_counter, 2.4 km/h per Hz), rain gauge on GPIO26 (pulse_counter, 0.2794 mm per pulse, daily total), wind vane on GPIO35 through a 10 k divider (adc with a lookup to 16 directions using SparkFun's table), and a BME280 on I2C GPIO21/22.
Then write a Home Assistant automation that at 7:00 sends the last 12 hours of readings plus the NWS forecast entity to my local conversation agent and posts its 3-sentence note, labeled "hobby note, not an official forecast".
Use only names from the current ESPHome and Home Assistant docs.
Troubleshooting
- Wind direction is wrong: The lookup table or North alignment. Recalibrate with a compass.
- Rain counts when dry: Switch bounce or wind shaking the gauge. Add debounce and level the gauge.
- Temperature too high on sunny days: Radiation shield is not ventilated enough or the sensor touches it.
Print files
- Radiation shield Stevenson screen (MakerMeik, CC BY-NC. We don't host this file.)
Files, code and docs
- SparkFun Weather Meter Kit hookup guide (Vendor docs)
- Radiation shield Stevenson screen (MakerMeik, Printables 109971) (CC BY-NC — link only, do not host or redistribute)
- ESPHome documentation (Vendor docs)
- Home Assistant (Vendor docs)
- National Weather Service (Vendor docs)
Last checked 2026-11-12. Double-check parts against your own board and seller listings before you buy.