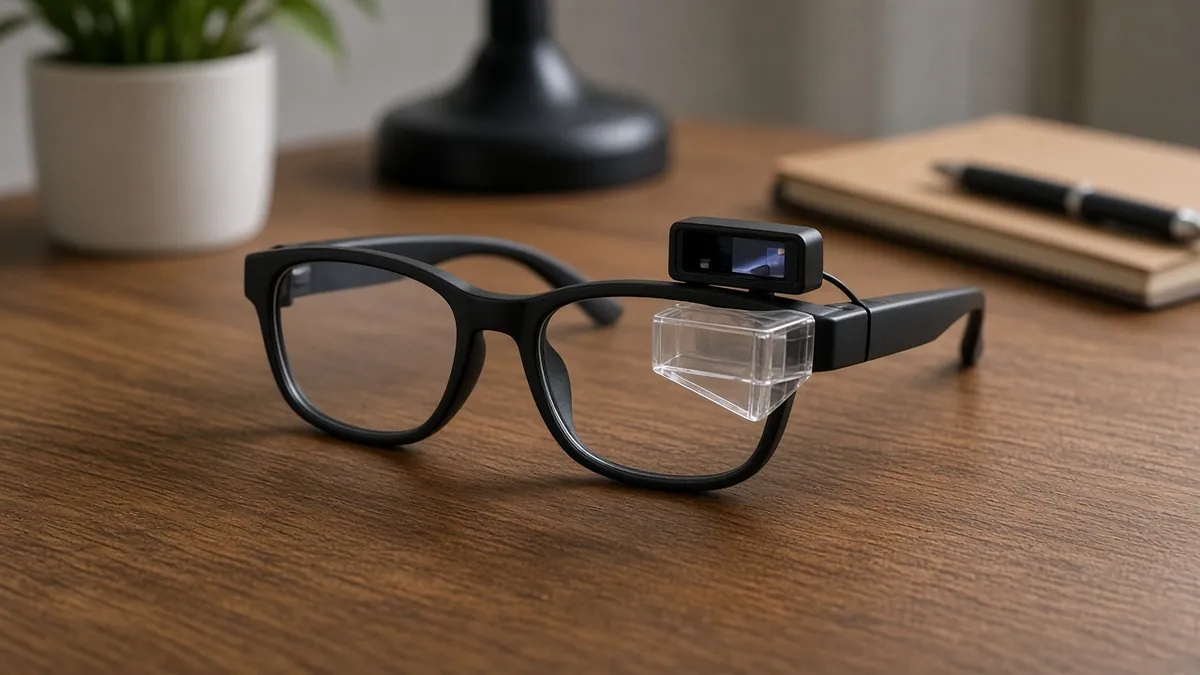
Smart glasses HUD prototype
A lab prototype that reflects a tiny OLED into a piece of clear acrylic so a few lines of text appear to float in front of one eye. It is a desk experiment, not street-ready eyewear.
Safety first
- This is a bench prototype. Do not walk in traffic, drive, cycle, or operate tools while wearing it.
- Keep the display dim. A bright OLED reflected into an eye can be painful, especially in a dark room, and can distract you from real obstacles.
- Watch for heat and for sharp mount edges near the eye. There should be no glass or acrylic edge that can enter the eye socket if the mount slips.
- This is not a medical, safety, or aviation device.
Rules and laws
- Wearing a display in your field of view may be illegal or banned while driving. Do not use it on the road.
- If you later add a camera, all of the usual consent and privacy rules apply. This base project is text only.
Parts
| Part | Qty | Approx. each | Subtotal |
|---|---|---|---|
| Very small SSD1306-class OLED, 0.49-inch or 0.91-inchSmaller is easier to bounce into a combiner. Typical $5-12, no verified link.Amazon (search) | 1 | $8 | $8 |
| Espressif ESP32-DevKitC-32E (DevKitC V4) development boardA Pico also works and is smaller. This is a full-size 38-pin DevKit and is bulky in glasses. Official Espressif 38-pin DevKitC V4 with ESP32-WROOM-32E (4 MB). Micro-USB port, not USB-C. Buy only the official 38-pin Micro-USB board, not a USB-C or 30-pin clone. Primary listing: Mouser 356-ESP32-DEVKITC32E, $10.20, 1,701 in stock on Nov 12, 2026, per Findchips (https://www.findchips.com/search/ESP32-DEVKITC-32E). The Mouser US page itself returned 403 to a direct fetch, so click-confirm the US storefront before you order. Mouser Netherlands listed 1,622 in stock at €8.60 the same day. Do not use DigiKey as the default today (search snippets showed 0 in stock / long lead time). Official Amazon listing https://www.amazon.com/dp/B09MQJWQN2 was still unavailable; use it if it returns. Amazon search for the official board: https://www.amazon.com/s?k=ESP32-DevKitC-32E. Adafruit #3269 remains $15.00 and was out of stock (https://www.adafruit.com/product/3269). Typical $10-16.Mouser · price seen on 2026-11-12 | 1 | $10.20 | $10.20 |
| Small clear acrylic sheet or hobby beam splitterTypical $5-15, no verified link.Amazon (search) | 1 | $8 | $8 |
| Inexpensive glasses frame or a printed mock frameTypical $5-15, no verified link.Amazon (search) | 1 | $8 | $8 |
| USB power bank, 5 V, quality pack with an obvious switchTypical $12-25, no verified link.Amazon (search) | 1 | $15 | $15 |
| Estimated total (parts only) | $49.20 | ||
Typical US prices, checked 2026-11-12. Prices change and multi-packs are often cheaper per piece.
As an Amazon Associate I earn from qualifying purchases. Prices change; check the store.
Filament
PLA (1.75 mm): about 35 g (11.7 m), roughly 3 h of printing.
PLA, 0.2 mm layers, 20% infill, 2-3 walls, supports if the glasses mount has a thin hook. Print a bench stand first, then a wearable mount only after the optics work on the desk.
AI agents you'll use
- Firmware helper (ChatGPT, Claude, Gemini or Grok): Writes a dim, large-type Arduino sketch for the OLED (time, a heading, a single line of text) and reminds you to keep brightness low.
- Optics helper: Talks through a bench alignment of a reflected OLED without inventing a prescription lens design.
Tools
- 3D printer or a careful glue-up
- Soldering iron
- Calipers
- Computer to flash an ESP32 or a Pico
- Optional dark room for alignment
What you'll learn
- Driving a small I2C or SPI OLED
- A simple beam-splitter / reflection HUD layout at a hobby scale
- Why alignment and brightness are hard
- The safety limits of walking around with a display in your field of view
A commercial HUD is an optics problem that companies spend years on. This project is a honest prototype: a tiny OLED, a clear piece of acrylic as a combiner, and a few dim lines of text you can read while sitting at a desk. If the text is readable on a stand, you have succeeded.
What you'll build
A bench mount, then optionally a glasses-shaped wearable, with an ESP32 or Pico, a very small SSD1306-class OLED, and a simple reflector. The software should show large, dim text (a clock, a single status line), not a dense dashboard.
Print the parts
Print a desk stand that holds the OLED, the acrylic, and your eye position first. Search Printables or Thingiverse for "DIY HUD glasses OLED" only as inspiration, and credit any designer whose file you actually use. Do not start with a tight face-worn file that puts acrylic edges near the eye.
Wiring
Example for an I2C SSD1306 on an ESP32. Confirm voltage: many small OLEDs are 3.3 V only.
| From | To (ESP32) |
|---|---|
| OLED VCC | 3.3 V (unless the module is documented as 5 V-safe) |
| OLED GND | GND |
| OLED SDA | GPIO 21 |
| OLED SCL | GPIO 22 |
| USB power | The board's USB port, from a power bank once you leave the computer |
Step-by-step
- Get the OLED working on a breadboard with a large-font "HELLO" sketch, at low contrast.
- Build a desk jig: OLED off to the side, acrylic at an angle, a mark where your eye will be. Adjust until you can read the reflection without moving the jig.
- Reduce brightness until it is readable but not glaring. Add a hood so room lights do not wash it out.
- Print a stiffer mount only after the jig works. Round or cover every acrylic edge.
- If you try it on glasses, sit in a chair, with a friend present, and take it off before you stand up and walk around.
- Add a real data source later (time from NTP, or a single line from a local serial port). Do not pack the screen with tiny type.
Code
Prompt for the helper:
Write an Arduino sketch for an ESP32 and a 128x32 or 128x64 SSD1306 (I2C, 0x3C, SDA 21, SCL 22) that shows a large, dim clock and one short status line.
Use the Adafruit SSD1306 library, avoid bright all-white screens, and add a clearly labeled contrast or brightness setting. Comment the code.
#include <Adafruit_SSD1306.h>
Adafruit_SSD1306 d(128, 32, &Wire, -1);
void setup() {
  d.begin(SSD1306_SWITCHCAPVCC, 0x3C);
  d.clearDisplay();
  d.setTextSize(2);
  d.setTextColor(SSD1306_WHITE);
  d.setCursor(0, 8);
  d.print("12:00");
  d.display();
}
void loop() {}
Troubleshooting
- You only see a ghost: the angle or the distance is off, or the room is too bright. Go back to the jig, not to a brighter screen first.
- The image is cut off: the OLED is too large, or your eye is too close. A smaller panel is easier.
- Blank module: I2C address, 5 V into a 3.3 V panel, or swapped SDA/SCL.
- Headache or dizziness: stop. The prototype is not usable as daily eyewear.
Files, code and docs
- Adafruit SSD1306 OLED library (BSD)
- Installing the Arduino-ESP32 core (Espressif docs) (Vendor docs)
Last checked 2026-11-12. Double-check parts against your own board and seller listings before you buy.