AI photo booth with style filters
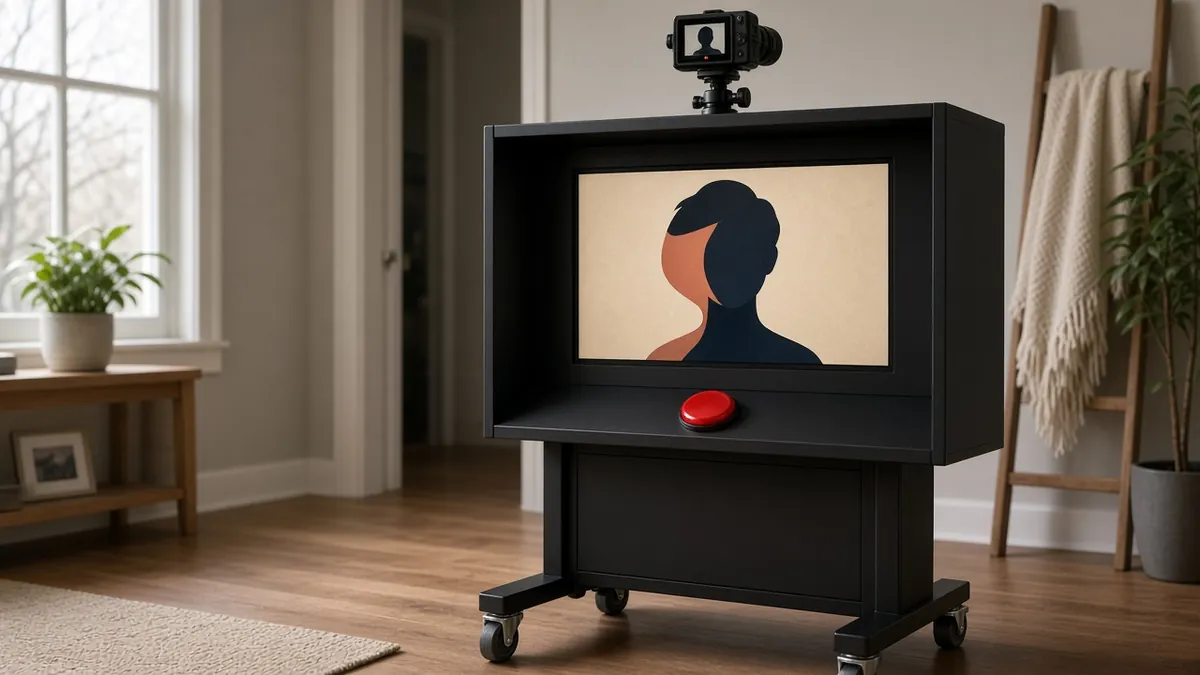
A Raspberry Pi camera in a simple booth or stand that takes a picture, applies a style or portrait effect on a computer you control, and shows the result on a screen. Guests should see that the stylized image is an illustration, not a candid snapshot.
Safety first
- Use the official or a correctly rated Pi power supply. Route cables so guests cannot trip or yank a monitor off a table.
- This is a low-voltage project. No mains inside a printed hood; use listed monitor and Pi supplies as they came.
- Do not add a live flash that can fire into someone's eyes at close range. Use steady lamps.
Rules and laws
- Ask each person before you take and stylize their photo. Do not scrape a party with a hidden camera.
- Label the on-screen result as a stylized illustration, not an official ID photo.
- Follow the license and acceptable-use rules of any model weights you run. Delete or export photos only with the guest's agreement.
Parts
| Part | Qty | Approx. each | Subtotal |
|---|---|---|---|
| Raspberry Pi 5, 4 GB (SC1111/SC1431)Price seen ~$110.00 on PiShop.us, Nov 12, 2026. Price seen $110.00, in stock, on PiShop.us (a Raspberry Pi approved reseller). Amazon listing B0CK3L9WD3 exists but was not used because reseller pricing was lower and clearer.PiShop.us · price seen on 2026-11-12 | 1 | $110 | $110 |
| USB-C PD 27 W power supply for Raspberry Pi 5, ETL listedPrice seen ~$11.95 on PiShop.us, Nov 12, 2026. Price seen $11.95 as a related item on the PiShop Raspberry Pi 5 page.PiShop.us · price seen on 2026-11-12 | 1 | $11.95 | $11.95 |
| Raspberry Pi Camera Module 3 Standard, 12 MP autofocusPrice seen ~$29.25 on Adafruit, Nov 12, 2026. Price seen $29.25, in stock, on Adafruit. Pi 5 needs a separate adapter cable.Adafruit · price seen on 2026-11-12 | 1 | $29.25 | $29.25 |
| Small HDMI screen or a used computer monitorTypical $30-80, no verified link.Amazon (search) | 1 | $50 | $50 |
| Momentary push buttonTypical $1-6, no verified link.Amazon (search) | 1 | $3 | $3 |
| microSD card, 32 GB or larger, application classTypical $8-15, no verified link this pass.Amazon (search) | 1 | $10 | $10 |
| Estimated total (parts only) | $214.20 | ||
Typical US prices, checked 2026-11-12. Prices change and multi-packs are often cheaper per piece.
As an Amazon Associate I earn from qualifying purchases. Prices change; check the store.
Filament
PLA (1.75 mm): about 180 g (60.4 m), roughly 12 h of printing.
PLA, 0.2 mm layers, 15-20% infill, 3 walls, supports for a hood or a button bezel. Foam board plus a few printed clips is a valid, lighter booth.
AI agents you'll use
- Kiosk helper (ChatGPT, Claude, Gemini or Grok): Writes a Python loop that takes a photo on a button press, calls a local style API or script you already have, and shows the result, with a consent prompt on screen.
- Privacy helper: Helps you write the on-screen consent text and a plan to delete photos after the event.
Tools
- Computer to flash the Pi
- Optional 3D printer or foam-board tools
- Screwdriver
- microSD reader
- Good lighting or a desk lamp
What you'll learn
- Capturing a still image on a Raspberry Pi
- Sending that image to a local style or portrait model you already can run
- Building a simple kiosk loop with a button
- Consent and labeling when you stylize people's faces
A button, a camera, a screen, and a local style model: guests pose, you stylize, they laugh, you delete or send the file if they want it. The quality of the "AI filter" depends on a model you can actually run locally (on the Pi, or on a desktop next to it). This is an event prop, not a facial-recognition system.
What you'll build
A tabletop or booth stand with a Raspberry Pi, a camera at face height, a screen, and a button. A first version can even save a plain photo; add the style model once the kiosk loop is reliable.
Print the parts
Search Printables or Thingiverse for a Pi camera stand or a booth hood, credit the designer, or build a foam-board box with printed clips. Print with the settings above. Keep the lens unobstructed and the screen glare in mind.
Wiring
| From | To |
|---|---|
| Official Pi power | Pi USB-C power |
| Camera Module 3 ribbon | The Pi camera connector, contacts in the official orientation |
| or USB webcam | A Pi USB port |
| HDMI screen | Pi HDMI, plus the screen's own listed supply |
| GPIO button (example) | A GPIO and GND, for example GPIO 17 and GND, with a documented debounce in software |
| Optional desktop "model box" | The same LAN as the Pi, HTTPS or HTTP only on your private network |
Step-by-step
- Flash official Raspberry Pi OS, test the camera with the official camera tools, and test the screen.
- Wire a button and write (or generate) a script that takes a still photo on press and shows it full screen.
- Add a first-screen consent message: a photo will be taken and stylized, and it will be deleted unless the guest says otherwise.
- On the Pi or on a desktop, get one local style or portrait model running on a sample photo, using that project's official docs (a small style-transfer model or a local image-to-image tool you already trust).
- Hook the kiosk script to that model, show a "working" message, and display the result with an "Illustration" label on screen.
- Build the stand, light the face with a steady lamp, and do a guest rehearsal with friends.
- After the event, delete files that guests did not ask to keep.
Code
Prompt for the helper:
Write a Python kiosk script for Raspberry Pi OS that: shows a consent message, waits for a GPIO button on pin 17, captures a still photo with the official camera tools or a documented library, calls a local HTTP API I will fill in for a style model, and displays the result with the word Illustration on the screen.
Include a simple delete-or-keep option. Do not upload the image to any cloud API. Comment the camera and GPIO parts.
Get the capture-and-display loop working before you touch a model.
Troubleshooting
- Black preview: the ribbon is flipped, or a USB webcam is not the default device.
- Style step takes minutes: run the model on a desktop, or pick a smaller model. A booth cannot ask people to wait that long.
- Colors look odd: your lighting is mixed or too dim. Fix light before you change the model.
- Guests do not notice the camera: raise the consent text and add a physical shutter click or a countdown.
Files, code and docs
- Raspberry Pi official documentation (Vendor docs)
- Raspberry Pi Camera documentation (Vendor docs)
Last checked 2026-11-12. Double-check parts against your own board and seller listings before you buy.