Line-following robot car
A two-wheel robot that follows a strip of black tape using inexpensive IR sensors and a short control loop. A classic first mobile-robot build, with an AI helper writing the firmware.
Safety first
- Unplug power before you change wiring. Confirm the motor pack goes to the driver's VM pin, not the ESP32 3.3 V pin.
- If you use a lithium pack, use a protected cell or pack, the correct charger, and do not leave charging unattended.
- Keep fingers and cables away from spinning wheels.
- This is a low-voltage project. No mains wiring.
Parts
| Part | Qty | Approx. each | Subtotal |
|---|---|---|---|
| Espressif ESP32-DevKitC-32E (DevKitC V4) development boardOfficial Espressif 38-pin DevKitC V4 with ESP32-WROOM-32E (4 MB). Micro-USB port, not USB-C. Buy only the official 38-pin Micro-USB board, not a USB-C or 30-pin clone. Primary listing: Mouser 356-ESP32-DEVKITC32E, $10.20, 1,701 in stock on Nov 12, 2026, per Findchips (https://www.findchips.com/search/ESP32-DEVKITC-32E). The Mouser US page itself returned 403 to a direct fetch, so click-confirm the US storefront before you order. Mouser Netherlands listed 1,622 in stock at €8.60 the same day. Do not use DigiKey as the default today (search snippets showed 0 in stock / long lead time). Official Amazon listing https://www.amazon.com/dp/B09MQJWQN2 was still unavailable; use it if it returns. Amazon search for the official board: https://www.amazon.com/s?k=ESP32-DevKitC-32E. Adafruit #3269 remains $15.00 and was out of stock (https://www.adafruit.com/product/3269). Typical $10-16.Mouser · price seen on 2026-11-12 | 1 | $10.20 | $10.20 |
| SparkFun Motor Driver - Dual TB6612FNG (with headers)Price seen ~$14.50 on SparkFun, Nov 12, 2026. Price seen $14.50 on SparkFun. Amazon listings exist but had few reviews and a higher price, so the official page is the source.SparkFun · price seen on 2026-11-12 | 1 | $14.50 | $14.50 |
| TT 3-6 V gearbox motor with wheel (2-set)One 2-motor kit covers this chassis. Typical $3.5-$6.5 each (or see pack note). ASIN confirmed for a 2-motor kit. Typical $8-13 for the set. Unit price is an estimate.Amazon | 1 | $5 | $5 |
| DAOKI TCRT5000 IR reflectance sensor (5-pack)Use three sensors from the pack; confirm analog outputs. Typical $1.2-$2.2 each (or see pack note). ASIN confirmed. Typical $6-11 for a 5-pack. Confirm the board is analog if your sketch reads ADC.Amazon | 1 | $1.60 | $1.60 |
| Small swivel caster or ball wheelTypical $2-4, no verified link.Amazon (search) | 1 | $2.50 | $2.50 |
| 4x AA battery holder with switch, or a 5 V USB power bank you already ownIf you use lithium cells, use a protected pack within the driver ratings. Typical $3-8 for a holder, no verified link.Amazon (search) | 1 | $5 | $5 |
| M3 screws, standoffs, and jumper wiresTypical $4-8 for a small hardware kit, no verified link.Amazon (search) | 1 | $5 | $5 |
| Estimated total (parts only) | $43.80 | ||
Typical US prices, checked 2026-11-12. Prices change and multi-packs are often cheaper per piece.
As an Amazon Associate I earn from qualifying purchases. Prices change; check the store.
Filament
PLA (1.75 mm): about 90 g (30.2 m), roughly 6 h of printing.
PLA, 0.4 mm nozzle, 0.2 mm layers, 25% infill, 3 walls. Supports only if your chassis has overhanging motor pockets or a sensor rake. If you buy a kit chassis, skip the print.
AI agents you'll use
- Code helper (ChatGPT, Claude, Gemini or Grok): Writes the ESP32 sketch for a three-sensor proportional follower, a calibration routine, and debug prints, then fixes compile errors you paste back in.
- Tuning helper: Looks at raw ADC logs from white paper and black tape and suggests a threshold and why the robot might lose the line on tight corners.
- Wiring checker: Reviews motor-driver voltage pins (VM vs VCC) and ESP32 ADC pin choices before you power the motors.
Tools
- 3D printer or a kit chassis
- Small screwdriver
- Multimeter
- Computer with Arduino IDE or PlatformIO
- USB data cable
- Black electrical tape and a light-colored board for a test track
What you'll learn
- Reading analog IR reflectance sensors
- Driving two DC motors with a dual H-bridge
- Calibrating a threshold for your floor and tape
- A simple proportional steering loop
This little car follows a loop of matte black tape on a light floor. Three inexpensive IR sensors look at the ground, a short program steers the two motors, and you spend most of your time calibrating for your room's lighting rather than wrestling with a big chassis.
What you'll build
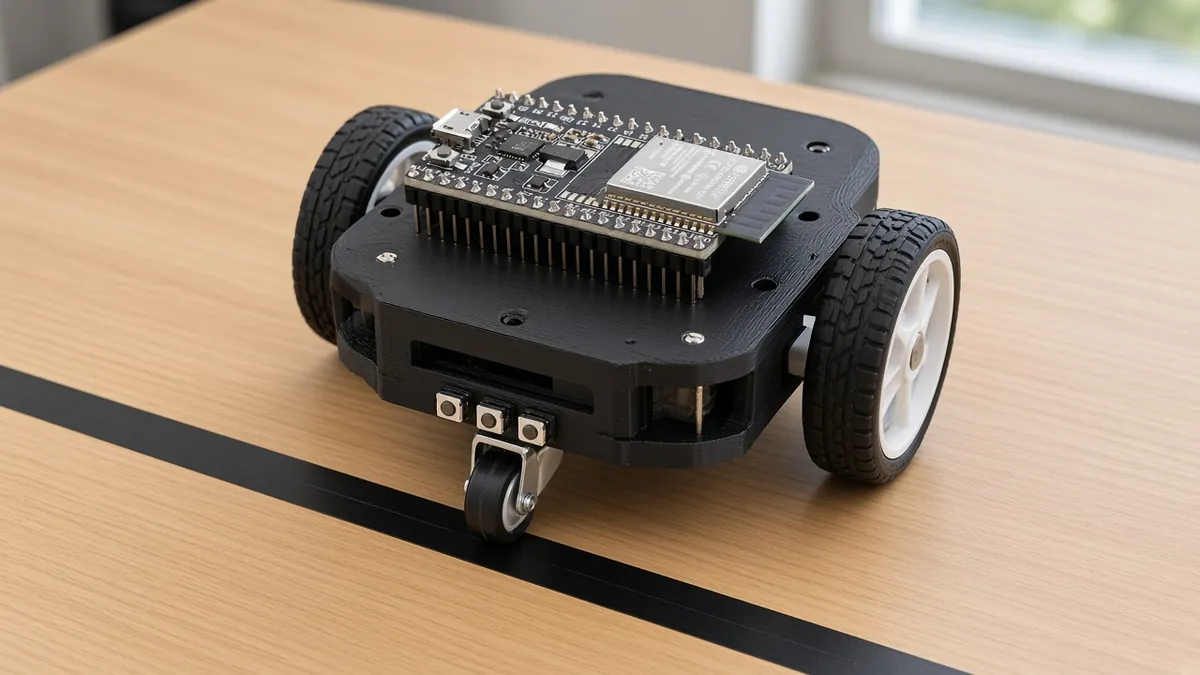
A printed or kit two-wheel chassis, about the size of a paperback, with a caster in the back, a rake of three reflectance sensors in the front, a TB6612FNG motor driver, and an ESP32. On a simple oval of tape it should trundle around without being touched.
Print the parts
Search Printables or Thingiverse for an open-licensed "line follower chassis TT motor TCRT5000" and credit the designer. Before you slice, check the motor hole spacing, the caster height, and that the sensors will sit a few millimeters above the floor, not dragging.
Print with the settings in the frontmatter. Expect roughly 90 g of PLA for a typical compact chassis; confirm in your slicer. If you already have an acrylic or 2WD kit chassis, skip printing and drill a sensor rake instead.
Wiring
| From | To (ESP32, unless noted) |
|---|---|
| TB6612 PWMA | GPIO 25 |
| TB6612 AIN1, AIN2 | GPIO 26, GPIO 27 |
| TB6612 PWMB | GPIO 14 |
| TB6612 BIN1, BIN2 | GPIO 12, GPIO 13 |
| TB6612 STBY | GPIO 33 (hold HIGH to enable) |
| TB6612 VM | Motor battery (within the driver's rating, often up to 15 V) |
| TB6612 VCC | 5 V or 3.3 V, exactly as your module is marked |
| TB6612 GND | Common ground with the ESP32 and battery |
| Left / center / right TCRT5000 analog out | GPIO 34, 35, 32 (input-only ADC pins) |
| Sensor VCC and GND | 3.3 V and GND, unless your sensor board is clearly 5 V-only |
Pin labels differ between ESP32 boards. Paste your board pinout into the wiring checker before you apply motor power. Do not feed motor voltage into the ESP32 3.3 V pin.
Step-by-step
- Assemble or print the chassis and mount the motors, wheels, caster, and sensor rake.
- Install the Arduino IDE and the ESP32 board package (see the Espressif link above).
- Wire the TB6612 and hang the wheels off the desk. Run a short "left motor forward, right motor forward" sketch so you can swap a reversed motor or driver input.
- Wire the three sensors and open the Serial Monitor. Roll them over white paper and over black tape, and write down the ADC ranges.
- Build a simple oval of matte black electrical tape on a light board. Avoid glossy tape, which can look like white under IR.
- Ask your code helper for the follower sketch (prompt below), set the threshold in the gap between white and black, and flash it.
- Test at a low base speed. If it oscillates, lower the steering gain or the speed. If it loses the line on corners, slow down or add sensors later.
- Strain-relieve the wires, add a power switch, and keep the battery from sliding.
Code
Prompt for the code helper:
Write an Arduino-ESP32 sketch for a two-motor line follower using a TB6612FNG (PWMA 25, AIN1 26, AIN2 27, PWMB 14, BIN1 12, BIN2 13, STBY 33) and three analog TCRT5000 sensors on GPIO 34, 35 and 32.
Include a drive(left, right) helper from -255 to 255, a startup calibration or clearly labeled threshold constant, Serial prints of the three ADC values, and a simple proportional steering loop.
Do not invent PID gains that you claim will work on every robot. Comment the code for a beginner.
A minimal motor helper you can use to check direction before the full sketch:
const int PWMA = 25, AIN1 = 26, AIN2 = 27;
const int PWMB = 14, BIN1 = 12, BIN2 = 13, STBY = 33;

void drive(int left, int right) {
  digitalWrite(STBY, HIGH);
  digitalWrite(AIN1, left >= 0); digitalWrite(AIN2, left < 0);
  digitalWrite(BIN1, right >= 0); digitalWrite(BIN2, right < 0);
  analogWrite(PWMA, constrain(abs(left), 0, 255));
  analogWrite(PWMB, constrain(abs(right), 0, 255));
}
ESP32 ADC readings are not on the same 0-1023 scale as an Arduino Uno. Recalibrate if you change boards or floors.
Troubleshooting
- Both motors twitch and the ESP32 resets: motor current is sagging the logic supply. Separate VM from the ESP32 USB supply and share ground only.
- It veers one way on a straight line: swap a reversed motor, or swap the left/right sensor pins in code.
- Raw values barely change on tape: the rake is too high, the floor is too shiny, or the sensor is a digital module, not analog.
- GPIO 12 boot trouble: GPIO 12 is a strapping pin. If the board will not flash, move BIN2 and mention the new pin to the code helper.
Files, code and docs
- Installing the Arduino-ESP32 core (Espressif docs) (Vendor docs)
- TB6612FNG hookup guide (SparkFun) (Vendor docs)
Last checked 2026-11-12. Double-check parts against your own board and seller listings before you buy.