Mini sumo robot (10 cm, 500 g class)
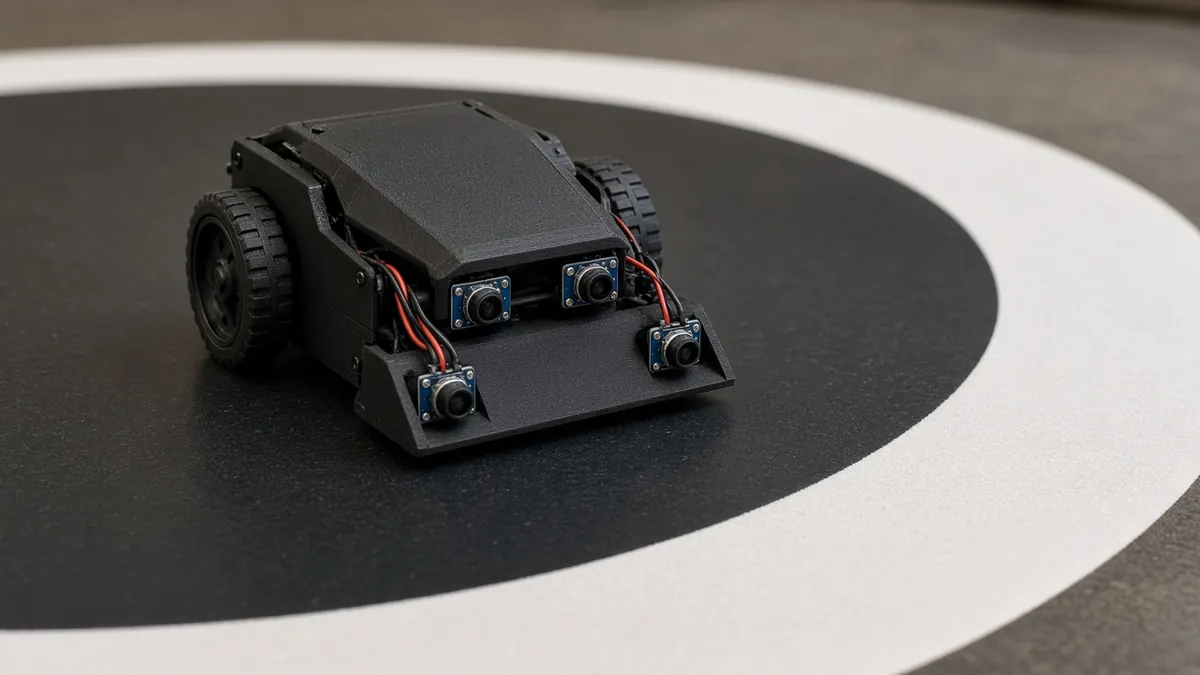
A 10 x 10 cm autonomous sumo bot with two N20 gear motors, a DRV8833 driver, two VL53L0X time-of-flight sensors to find the opponent and two TCRT5000 sensors to stay inside the ring. An Arduino Nano runs it on a 2S LiPo.
Safety first
- Charge LiPo packs in a fire-safe bag, never unattended. Do not charge a damaged or swollen pack.
- A 2S pack is 8.4 V when full, above the motors' 6 V rating: cap the PWM in code (about 70%) so the motors and driver last.
- The scoop edge can be sharp after filing. Round the corners slightly and keep fingers clear while it is armed.
Parts
| Part | Qty | Approx. each | Subtotal |
|---|---|---|---|
| ELEGOO Nano V3.0 board (3-pack)Typical $13-20, no verified link.Amazon (search) | 1 | $17 | $17 |
| N20 6 V 300 RPM micro gear motorOften sold in pairs with wheels. Typical $5-10, no verified link.Amazon (search) | 2 | $7 | $14 |
| Pololu DRV8833 dual motor driver carrierPrice seen $10.95 on Pololu (Nov 12, 2026). Generic DRV8833 boards on Amazon are $2-4 each.Pololu | 1 | $10.95 | $10.95 |
| VL53L0X time-of-flight distance sensorTwo front-facing; they share the I2C address, so one is re-addressed at startup using its XSHUT pin. Adafruit sells it for $14.95. Typical $4-15, no verified link.Amazon (search) | 2 | $6 | $12 |
| DAOKI TCRT5000 IR reflectance sensor (5-pack)Two face down at the front corners to see the white ring edge. Catalog ASIN, sold as a 5-pack. Typical $6-10.Amazon | 1 | $8 | $8 |
| 34 mm N20 silicone wheels (pair)Typical $4-9, no verified link.Amazon (search) | 1 | $6 | $6 |
| 2S 7.4 V 450 mAh LiPo with XT30Typical $8-14, no verified link.Amazon (search) | 1 | $10 | $10 |
| 12 mm momentary push button (10-pack)Start button for the 5-second delay. Typical $4-8, no verified link.Amazon (search) | 1 | $6 | $6 |
| Mini slide switch (10-pack)Main power switch. Typical $4-8, no verified link.Amazon (search) | 1 | $6 | $6 |
| XT60 female to XT30 male charge adapter (2-pack)Lets the XT60 charger charge the XT30 pack. Typical $5-10, no verified link.Amazon (search) | 1 | $7 | $7 |
| Steel washers M8 (ballast, 50-pack)Add weight up to the 500 g limit. Typical $5-9, no verified link.Amazon (search) | 1 | $7 | $7 |
| ToolkitRC M6 LiPo balance chargerSkip if you already own one. Needs a 12-24 V DC supply (many people use a laptop-style 19 V brick). Typical $35-50, no verified link.Amazon (search) | 1 | $40 | $40 |
| ToolkitRC ADP180 180 W 19.5 V power supply (XT60)Skip if you already own one. Powers the DC-only M6 charger from a wall outlet; skip it if you already have a 12-28 V DC supply with an XT60 lead. Typical $30-50, no verified link.Amazon (search) | 1 | $40 | $40 |
| LiPo fire-safe charging bagTypical $8-15, no verified link.Amazon (search) | 1 | $10 | $10 |
| Estimated total (parts only) | $193.95 | ||
Typical US prices, checked 2026-11-12. Prices change and multi-packs are often cheaper per piece.
As an Amazon Associate I earn from qualifying purchases. Prices change; check the store.
Filament
PLA (1.75 mm): about 90 g (30.2 m), roughly 5 h of printing.
PLA, 0.2 mm layers, 40% infill, 4 walls for the chassis; print the scoop flat and file its edge straight.
AI agents you'll use
- Code helper (ChatGPT, Claude, Gemini or Grok): Writes the Nano sketch: 5-second start delay, edge escape, search spin and attack, with both VL53L0X sensors re-addressed at boot.
- Rules checker: Summarizes the rules of the specific event you enter (size, weight, start procedure) from the text you paste, and checks your robot against them.
Tools
- Soldering iron
- Multimeter
- Small screwdrivers
- Kitchen scale that reads grams
- LiPo balance charger and a fire-safe bag
What you'll learn
- Reading two time-of-flight sensors on one I2C bus
- Edge detection with IR reflectance sensors
- PWM motor control and speed limits
- Competition rules: size, weight and the 5-second start delay
Two robots, one ring, first one pushed out loses. Mini sumo is a fast, friendly way into competitive robotics, and the whole bot fits in your palm.
What you'll build
A wedge-shaped robot no bigger than 10 x 10 cm and no heavier than 500 g, the common mini-sumo limits (check your event). The Nano waits 5 seconds after the start button, then spins to find the opponent with the two VL53L0X sensors, charges, and backs away whenever a TCRT5000 sees the white edge.
The cost range is $100-215. The low end assumes you already own these items marked "skip if you already own one": ToolkitRC M6 LiPo balance charger, ToolkitRC ADP180 180 W 19.5 V power supply (XT60). The high end includes them.
Print the parts
Search Printables for a "mini sumo" chassis that fits N20 motors and a 2S pack, check the license and credit the designer, or ask the AI helper to help you design a simple wedge in a CAD tool. Leave room for washers as ballast.
Wiring
| From | To | Notes |
|---|---|---|
| LiPo + | Slide switch, then Nano VIN and DRV8833 VIN | DRV8833 runs 2.7-10.8 V. |
| LiPo - | Common GND | |
| DRV8833 AIN1 / AIN2 | Nano D5 / D6 | PWM pins. |
| DRV8833 BIN1 / BIN2 | Nano D9 / D10 | PWM pins. |
| VL53L0X SDA / SCL (both) | Nano A4 / A5 | Power from the Nano 5V; the Pololu and most clone boards have a regulator. |
| VL53L0X left XSHUT / right XSHUT | Nano D7 / D8 | Used to re-address one sensor at boot. |
| TCRT5000 left / right OUT | Nano D2 / D3 | Digital outputs; tune the potentiometer on the white edge. |
| Start button | Nano D4 to GND | Use INPUT_PULLUP. |
Step-by-step
- Print the chassis and fit motors, wheels and battery; weigh it.
- Wire power through the switch and confirm the Nano boots from the LiPo.
- Wire the DRV8833 and test each motor forward and back at low PWM.
- Wire both VL53L0X sensors, bring them up one at a time with XSHUT, and give one a new address.
- Mount the TCRT5000 boards a few mm above the floor and tune them on a black surface with a white line.
- Write the 5-second start delay, edge escape, search and attack routine with the AI helper.
- Add washers until the robot is just under 500 g, and check the 10 x 10 cm footprint.
- Spar against a box or a friend's robot and tune the attack speed.
Code
Arduino IDE with the Pololu VL53L0X library. Keep the edge check as the first thing in every loop so the robot never drives out of the ring while attacking.
Prompt for the code helper:
Write an Arduino Nano mini-sumo sketch: DRV8833 on D5/D6 (left) and D9/D10 (right), two VL53L0X on I2C with XSHUT on D7 and D8 (set the second to address 0x30 at boot), two TCRT5000 edge sensors on D2/D3 (LOW = white edge), start button on D4.
Behaviour: wait for button, count 5 s, then loop: if an edge is seen, reverse and turn away; else if a sensor sees a target under 60 cm, drive toward it; else spin slowly to search.
Cap motor PWM at 180 of 255 because the motors are 6 V and the pack is 2S.
Troubleshooting
- Only one VL53L0X answers: Both are still at 0x29. Hold one in reset with XSHUT, change the other's address, then release.
- Drives out of the ring: The edge sensors are too high or the threshold is wrong. Lower them to 2-5 mm and retune.
- Wheels slip when pushing: Add weight over the drive wheels and clean the tires.
Files, code and docs
- Pololu VL53L0X Arduino library (MIT)
- DRV8833 carrier user guide (Pololu) (Vendor docs)
Last checked 2026-11-12. Double-check parts against your own board and seller listings before you buy.